
Command パターンを用いてコマンド操作のリプレイを実装する【Game Development Pattern With Unity】
- Environment
- Command Pattern
- Intro
- UML Diagram & Classes
- Pros and Cons
- When to Use
- Implement
- Test
- Outro
- References
こちらの書籍の第7章「Implement a Replay System with the Command Pattern」の解説です.
")
Environment
- Unity 2021.2.0b6
C# 9 の機能である「Target-typed new expression」を利用しているため,Unity 2021.1 以前ではエラー発生する箇所があります.
Command Pattern
アクションの実行や状態変化に必要な情報をカプセル化出来るデザインパターンです. コマンドパターンを利用することで,コマンドの取り消し,リプレイ,マクロ,自動操縦の実装がしやすくなります.
Intro
皆さんはジャンプ操作をどのように実装していますでしょうか. シンプルな実装としては以下のような簡易コードが出てくると思います.
public class InputHandler : MonoBehaviour
{
    CharacterController _characterController;

    void Update()
    {
        if (Input.GetKeyDown(KeyCode.Space))
        {
            _characterController.Jump();
        }
    }
}
しかし今後プレイヤーからの入力を記録したり,取り消したり,後から再生したりする場合には複雑な処理が必要になります. コマンドパターンを利用することで,操作を呼び出すクラスと,それを実行する方法を知っているクラスを切り離すことができます.
InputHandler がプレイヤーがスペースバーを押した時にどのようなアクションを起こすべきかを知る必要はなくなります.
コマンドパターンを利用した場合の簡易コードは以下のようになります.
public class InputHandler : MonoBehaviour
{
    CharacterController _characterController;

    Command _spaceButton;

    void Start()
    {
        _spaceButton = new JumpCommand();
    }

    void Update()
    {
        if (Input.GetKeyDown(KeyCode.Space))
        {
            _spaceButton.Execute(_characterController);
        }
    }
}
スペースバーを押した時、CharacterController を直接呼び出すだけなく, ジャンプアクションを実行するために必要なすべての情報をオブジェクトにカプセル化しており, キューに入れて後から再呼び出しできるようにしています.
UML Diagram & Classes
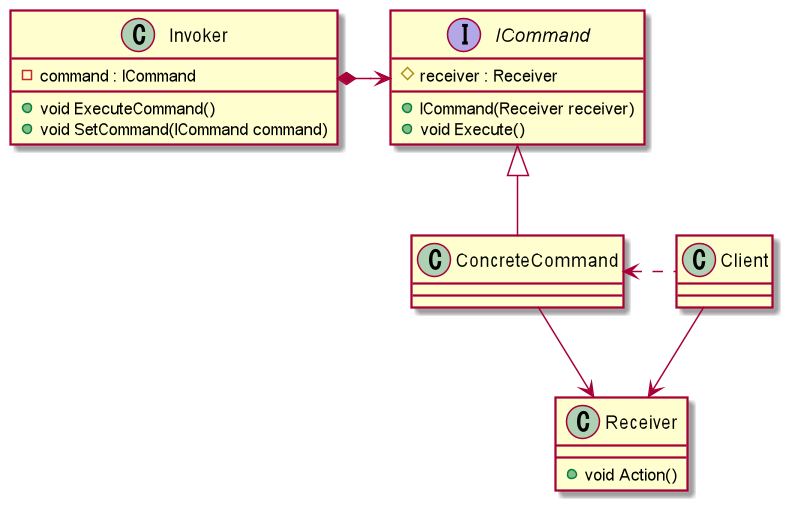
Command パターンを実装することで,アクションリクエストをオブジェクトとして カプセル化し,キューに入れてすぐに実行できるようになります.
Invoker
コマンド実行方法を知っているクラス ここでは,実行されたコマンドの記録を取ることも可能.
Receiver
コマンドを受信して実行するクラス
ICommand
コマンドインタフェース. Invoker がコマンドを実行するために呼べる Execute メソッドのみを公開. 抽象クラスにされているところもありますが,ここではインタフェースとします.
Pros and Cons
Pros
- 関心の分離
操作を呼び出すクラスと,それを実行する方法を知っているクラスを分離することができます. このように分離することで,操作の記録や順序付けを行う仲介者を追加することもできます.
- シーケンス化
ユーザの入力をキューに入れるプロセスを容易にします. これによって,実行の取り消し(Undo),再実行(Redo),マクロ,自動操縦,コマンドキューの実装が可能になります.
Cons
- 複雑さ
このパターンを実装するには,各コマンドがそれ自体クラスであるため,多数のクラスが必要になり, このパターンで構築されたコードを保守するには,このパターンをよく理解する必要があります. 特定の目的を持たずにこのパターンを仕様すると,不必要に複雑で冗長になります.
When to Use
- Undo / Redo を実装したい時
コマンドの取り消しや再実行を実装できます.
- マクロを実装したい時
例えばプレイヤーの攻撃や防御の一連のコンボを記録して, それを入力キーに割り当てることで自動的に実行できるマクロ記録システムの実装ができます.
- 自動操縦を実装したい時
ボットに自動的に連続に実行する一連のコマンドを記録することで,処理実行の自動化ができます.
Implement
Invoker
コマンド実装方法を知っているクラスを実装します. 実行されたコマンドを記録することもここでは行います.
using System.Collections.Generic;
using System.Linq;
using UnityEngine;

namespace Denity.CommandPatternSample
{
    /// <summary>
    /// コマンド発火クラス
    /// 今回は記録とリプレイも司る
    /// </summary>
    public sealed class Invoker : MonoBehaviour
    {
        bool _isRecording, _isReplaying;
        float _replayTime, _recordingTime;
        readonly SortedList<float, ICommand> _recordedCommands = new ();

        public void ExecuteCommand(ICommand command)
        {
            command.Execute();

            if (_isRecording)
            {
                _recordedCommands.Add(_recordingTime, command);
            }
        }

        /// <summary>
        /// コマンドの記録を行う
        /// </summary>
        public void Record()
        {
            _recordingTime = 0.0f;
            _isRecording = true;
        }

        /// <summary>
        /// コマンドの再実行を行う
        /// </summary>
        public void Replay()
        {
            _replayTime = 0.0f;
            _isReplaying = true;

            if (_recordedCommands.Count <= 0)
                Debug.LogError("リプレイ可能なコマンドがありません.");
        }

        void FixedUpdate()
        {
            if (_isRecording)
                _recordingTime += Time.fixedDeltaTime;

            if (_isReplaying)
            {
                _replayTime += Time.fixedDeltaTime;

                if (_recordedCommands.Any())
                {
                    if (Mathf.Approximately(_replayTime, _recordedCommands.Keys[0]))
                    {
                        _recordedCommands.Values[0].Execute();
                        _recordedCommands.RemoveAt(0);
                    }
                }
                else
                {
                    _isReplaying = false;
                }
            }
        }
    }
}
記録を行うためにここでは SortedList<処理時の時間,コマンド> を利用しています.
今回 FixedUpdate にしているのは,固定の時間ステップで実行できるようにしているためです.
ICommand
コマンドインタフェースの実装は以下になります. 実行メソッドしか公開しません.
namespace Denity.CommandPatternSample
{
    /// <summary>
    /// コマンドインタフェース
    /// </summary>
    public interface ICommand
    {
        void Execute();
    }
}
ConcreteCommands
今回は左移動コマンドと右移動コマンドだけ実装してみます.
namespace Denity.CommandPatternSample
{
    /// <summary>
    /// 左移動用のコマンド
    /// </summary>
    public sealed class TurnLeftCommand : ICommand
    {
        readonly PlayerController _controller;

        public TurnLeftCommand(PlayerController controller)
        {
            _controller = controller;
        }

        public void Execute()
        {
            _controller.Turn(MoveDirection.Left);
        }
    }
}
namespace Denity.CommandPatternSample
{
    /// <summary>
    /// 右移動用のコマンド
    /// </summary>
    public sealed class TurnRightCommand : ICommand
    {
        readonly PlayerController _controller;

        public TurnRightCommand(PlayerController controller)
        {
            _controller = controller;
        }

        public void Execute()
        {
            _controller.Turn(MoveDirection.Right);
        }
    }
}
namespace Denity.CommandPatternSample
{
    public enum MoveDirection
    {
        Left,
        Right
    }
}
Receiver
ここでは PlayerController になります.
using UnityEngine;

namespace Denity.CommandPatternSample
{
    /// <summary>
    /// プレイヤー操縦処理のクラス
    /// </summary>
    public sealed class PlayerController : MonoBehaviour
    {
        float _distance = 1.0f;

        public void Turn(MoveDirection direction)
        {
            if (direction == MoveDirection.Left)
                transform.Translate(Vector3.left * _distance);

            if (direction == MoveDirection.Right)
                transform.Translate(Vector3.right * _distance);
        }

        public void ResetPosition()
        {
            transform.position = Vector3.zero;
        }
    }
}
InputHandler
入力ハンドリングクラスを実装します.
using UnityEngine;

namespace Denity.CommandPatternSample
{
    /// <summary>
    /// 入力ハンドリングクラス
    /// </summary>
    public sealed class InputHandler : MonoBehaviour
    {
        Invoker _invoker;
        bool _isReplaying, _isRecording;
        PlayerController _playerController;
        ICommand _leftCommand, _rightCommand;

        void Start()
        {
            // 依存解決
            _invoker = gameObject.AddComponent<Invoker>();
            _playerController = FindObjectOfType<PlayerController>();

            // コマンド作成
            _leftCommand = new TurnLeftCommand(_playerController);
            _rightCommand = new TurnRightCommand(_playerController);
        }

        void Update()
        {
            if (!_isReplaying && _isRecording)
            {
                // Aボタン入力時のコマンドを実行する
                if (Input.GetKeyUp(KeyCode.A))
                    _invoker.ExecuteCommand(_leftCommand);

                // Dボタン入力時のコマンドを実行する
                if (Input.GetKeyUp(KeyCode.D))
                    _invoker.ExecuteCommand(_rightCommand);
            }
        }

        void OnGUI()
        {
            if (GUILayout.Button("記録開始"))
            {
                _playerController.ResetPosition();
                _isReplaying = false;
                _isRecording = true;
                // Invoker を通じて記録開始
                _invoker.Record();
            }

            if (GUILayout.Button("記録終了"))
            {
                _playerController.ResetPosition();
                _isRecording = false;
            }

            if (!_isRecording)
            {
                if (GUILayout.Button("リプレイ開始"))
                {
                    _playerController.ResetPosition();
                    _isRecording = false;
                    _isReplaying = true;
                    // Invoker を通じてリプレイ開始
                    _invoker.Replay();
                }
            }
        }
    }
}
Client
ここでは Player のことです. 今回は簡易のため,PlayerオブジェクトはPlayerControllerをコンポーネントとして持つようにします.
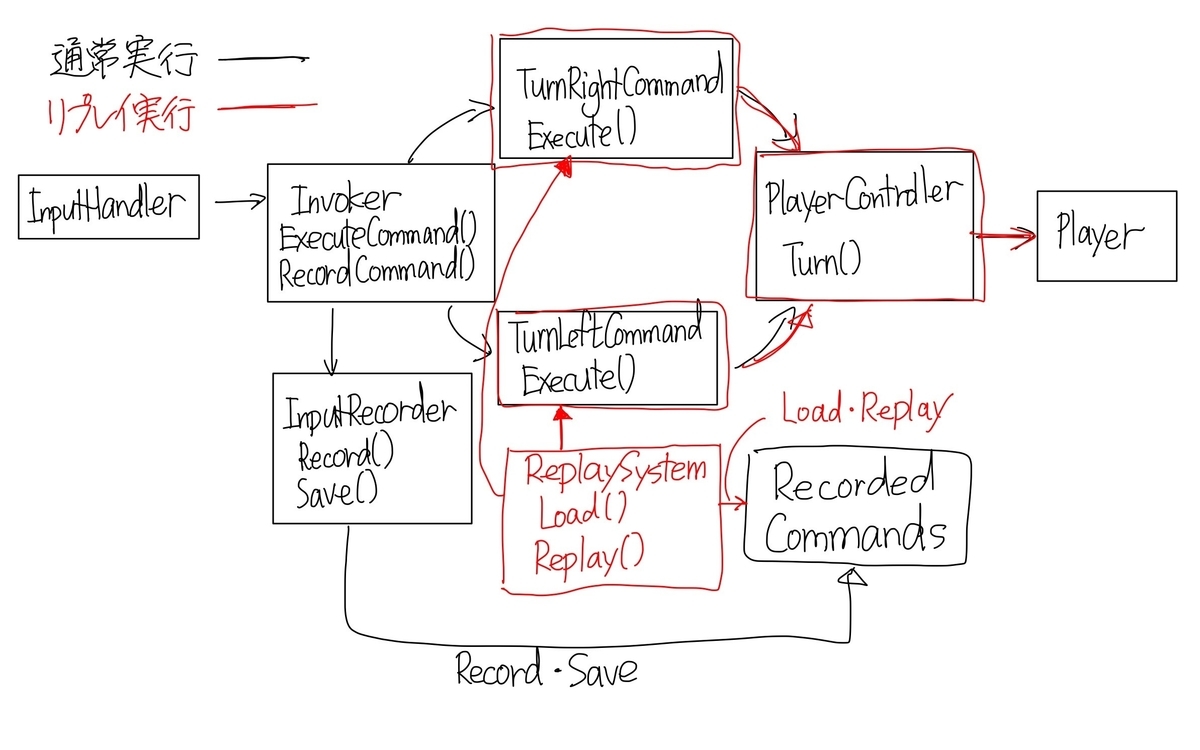
Flow
処理フローのイメージはこんな感じです. 黒線が通常実行のフロー,赤線がリプレイ実行のフローのイメージです(わかりづらくてすみません)
Test
実際に上で実装したコマンドパターンを利用してみます.
左上の記録開始ボタンを押下後に,左に1回,右に3回移動してみます. 移動完了後は記録を終了します.
上を行った後で,リプレイ開始を押してみます.
記録したコマンドをそのままリプレイしてくれました.
Outro
本記事ではコマンドパターンを用いたリプレイを実装してみました. コマンドパターンはリプレイだけでなく,Undo,Redo,Macroの実装も可能です. 詳細をより知りたい方は,以下の参考文献を見るといいと思います.
References
はなちるさんが同様な記事を書いております. www.hanachiru-blog.com
天神いなさんがより詳しくコマンドパターンについて説明しています. youtu.be
GitHubのサンプルも公開しており,ここでは ScriptableObject を用いた自動操縦の実装もあります.